
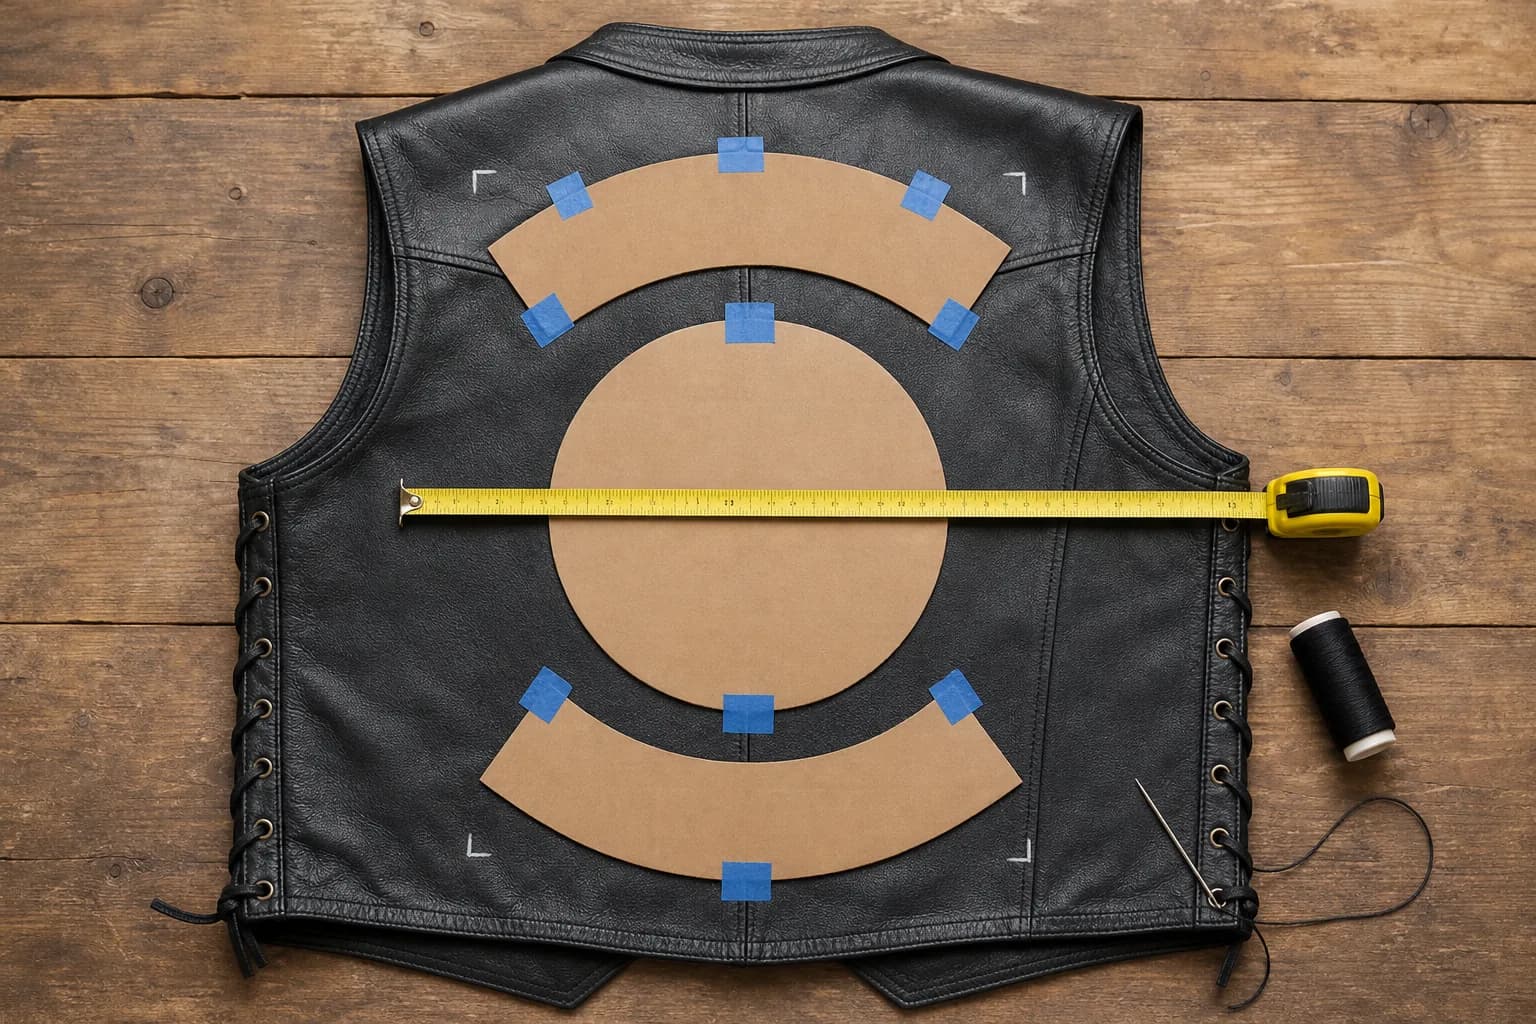
Placement is the hardest part of a vest to fix. A patch sewn in the wrong spot leaves needle holes, and on leather those holes stay for good.
Most riders put the main patch on the center of the back, with smaller patches on the chest, usually a name patch on the left and rank or flags on the right. Rally and event patches go on the lower front and sides. Keep every patch about 1/2 to 1 inch away from seams, the collar and the hem.
What goes on the back of a biker vest?
The back is the biggest space on the vest, so it gets the biggest patch. A single center patch is the simplest layout. It might hold a logo, a bike emblem or a group name. On an adult vest, center back patches commonly run about 10 to 12 inches wide. Plenty of riders stop right there.
Some riders add rockers. A rocker is a curved banner patch that sits above or below the center patch. The top rocker usually carries a name. The bottom rocker usually carries a place, like a state, region or chapter. Meanings vary, which is why online advice often conflicts.
Planning a design from scratch? Start with our custom motorcycle patches page and pick the center patch first. Everything else gets sized around it.
Is it okay to wear a three-piece back patch if I'm not in a club?
Often it isn't. Traditions vary by region and club. In many regions, a three-piece back with a territory bottom rocker signals club membership. Non-members, solo riders and riding groups usually wear a single back patch or a top rocker only.
If you belong to a club, follow its bylaws on layout, wording and placement. If you like a layout you saw on someone's vest, ask before you copy it. A quick question beats an awkward talk at a rally.
Where do chest, collar and side patches go?
The left chest is for your name or road name. Riders often call it the heart side, and many people put a memorial patch there too. The right chest usually takes a rank, an office or a flag. Chest patches commonly run 3 to 4 inches wide.
Some groups put a small patch on the collar. Rally and event patches usually go on the lower front and the sides, at about 2 to 4 inches each. Keep every patch 1/2 to 1 inch from the collar, seams and hem.
Embroidered patches suit a vest well because they come from 1 inch to 18 inches. That covers a small rally patch and a full back piece. Fine lines can get lost in embroidery, so for tiny text, like a long chapter name, a look at woven patches may help.
How do I measure my vest to size the back patches?
Guides give you a number, but your vest isn't their vest. Measure yours with this method.
- 1Lay the vest flat and smooth it out. Close the zipper or snaps.
- 2Measure the back width at shoulder-blade height, from side seam to side seam.
- 3Measure the back height from just under the collar seam down to the hem.
- 4Subtract 1 inch from each side and 1 inch from the top and bottom. That's your usable panel.
- 5Make the center patch about three quarters of the usable width.
- 6Make both rockers the same width as the center patch. Measure a rocker's height from the top of its arc to its lowest edge, not just the banner thickness. That usually lands at 2 to 3 inches.
- 7Set the center patch height from your design. A round or shield patch 12 inches wide is often 11 to 12 inches tall.
- 8Leave 1/2 to 1 inch between pieces, about 3/4 inch is typical. Add up the heights and check that the total fits your usable height.
Here's a worked example. Say your back panel measures 18 inches wide and 22 inches tall. Subtract the margins and you get a usable panel of 16 by 20 inches. Three quarters of 16 is 12, so the center patch is 12 inches wide. Both rockers are 12 inches wide and 3 inches tall.
Now check the height. Say the center shield comes out 11 inches tall. A 3 inch top rocker, a 3/4 inch gap, the 11 inch center patch, another 3/4 inch gap and a 3 inch bottom rocker add up to 18.5 inches. That fits inside 20 inches and leaves 1.5 inches to spare. Use the spare room to lift the set away from the hem.
Treat these numbers as a starting point, not a rule. A bigger rider may go wider. If you wear one center patch only, 12 inches is still plenty.
How do I test the layout before I sew anything?
Cut each patch out of cardboard or heavy paper at its exact size. Pin or tape the cut-outs to the vest. Use painter's tape on leather, because pins leave holes you can't fix.
Put the vest on and check the layout in a mirror. Then sit on the bike in your normal riding position. Check that the bottom rocker clears the seat and doesn't fold when you lean forward. Look at the lower back too, since that's where a vest creases most.
Wear the mockup for a short ride or an evening. Adjust anything that bugs you. Then mark the corners with chalk or a fabric pencil before you take the cut-outs off.
Should I sew patches on leather and denim vests, or iron them on?
Sew-on is the right call on leather. Heat can damage leather, and iron-on glue doesn't bond well to it. Use a leather needle and heavy polyester thread. If you don't have a machine that can handle it, a leather shop can stitch the set for you.
Denim takes stitching well, so a home machine or a hand needle both work. Iron-on is fine as a temporary hold on denim while you sew. Don't trust it on its own, since edges lift with washing and wear.
Every patch we make is available with sew-on, iron-on, Velcro or peel-and-stick backing. Velcro costs nothing extra. It's handy for swappable rally patches, as long as you sew a loop panel onto the vest first. Peel-and-stick is temporary only. Our guide to iron-on vs sew-on vs Velcro covers the trade-offs.
Leather patches are another route if you want a rugged, plain look on a denim vest. On a leather vest, the same sew-on rule applies to every patch you add.
What mistakes should I avoid when placing vest patches?
These are the slips that cost riders the most time.
- Skipping the margins, so patches cross seams or sit against the collar.
- Sizing the center patch from a photo instead of your actual back panel.
- Leaving uneven gaps between rockers.
- Placing the bottom rocker so low that it hits the seat and folds.
- Using iron-on glue on leather.
- Sewing before the mockup test.
- Copying a club layout without asking.
- Crowding small patches on the chest until none of them reads.
Nearly every one of these is caught by the cardboard mockup, which is why it's worth the extra evening.
How do I get vest patches made to fit?
Send your vest measurements and design with the quote, and we check the size on the free digital proof. Nothing is made until you approve it. As a rule of thumb, a bigger back piece and more thread colors raise the price, so the quote is the place to compare a 10 inch and a 12 inch center patch.
There's no minimum order, so even one patch is fine. If you only have a JPG or a photo, we redraw it for free. Shipping is free worldwide, and the 14-day guarantee covers a remake or a refund, your choice.